Page 19 of 46
Re: Home away from Home, on wheels.
Posted: Sun Aug 19, 2012 7:15 pm
by ObnoxiousBlue
Had to drive upto Monroe NY today for work.
When I got home. I finally got to tidy up my recent exhaust project. I picked up some VHT paint. Bill recommended it after the last stuff burned off. This is header paint, and is rated for heat Up to 2000 degrees F. We'll see how wel this holds up.
http://www.vhtpaint.com/products/flameproof/
I cleaned off the muffler. There wasn't any peeling paint or anything loose, so I list gave it a gentle clean with a scour pad. Then wiped it down to get the oil off.
I gave it a couple light coats each layered on 10 minutes apart, ending with one heavier coat as the instructions say finished within the hour.
After allowing a hour to dry, it needs to be cured.
Run at idle for 10 min
Let cool for 20 min
Run at idle for 20 min
Let cool for 20 min
Run at operating speed/temperature for 20 min
Let cool overnight
Let's see if this holds!
Re: Home away from Home, on wheels.
Posted: Sun Aug 19, 2012 8:29 pm
by Raj
interested to see if it holds up. I have yet to see paint that can withstand the temp
Re: Home away from Home, on wheels.
Posted: Sun Aug 19, 2012 8:41 pm
by Glenn
Raj wrote:interested to see if it holds up. I have yet to see paint that can withstand the temp
True... i've painted many headers and they all flake and rust.
Ceramic coated is the only one that lasts.
Re: Home away from Home, on wheels.
Posted: Sun Aug 19, 2012 10:17 pm
by AoT
Good thing you the read the directions!
Re: Home away from Home, on wheels.
Posted: Sun Aug 26, 2012 3:51 pm
by ObnoxiousBlue
Does anyone know how to remove the metal dash top in a bay? I want to repaint mine before the gathering...
Re: Home away from Home, on wheels.
Posted: Sun Aug 26, 2012 3:56 pm
by Glenn
ObnoxiousBlue wrote:Does anyone know how to remove the metal dash top in a bay? I want to repaint mine before the gathering...
Fixed???
Re: Home away from Home, on wheels.
Posted: Sun Aug 26, 2012 3:59 pm
by ObnoxiousBlue
Lol, fixed... Thanks Glenn. Damn autocorrect will be the downfall of my generation. I'm sure, sometime in the not too distant future we will unfortunately engage in nuclear war over a misconception born of the iPads autocorrect.
Re: Home away from Home, on wheels.
Posted: Sun Sep 09, 2012 11:22 am
by Raj
Glenn wrote:Raj wrote:interested to see if it holds up. I have yet to see paint that can withstand the temp
True... i've painted many headers and they all flake and rust.
Ceramic coated is the only one that lasts.
Mike,
Any update on the painted exhaust? Let's see how she looks after some miles.
Re: Home away from Home, on wheels.
Posted: Sun Sep 09, 2012 11:36 am
by ObnoxiousBlue
The muffler and "headers" have held up great. The tailpipe however has started to crack. I don't think this is a heat issue, but rather that the point where the cracking is occurring is right below the oil fill, and I don't think I did a good enough job cleaning the tailpipe before applying the paint.
I'll take a pricing a bit.
Re: Home away from Home, on wheels.
Posted: Sun Sep 09, 2012 4:38 pm
by Big_kid
ObnoxiousBlue wrote:... I'll take a pricing a bit.
What were you just saying about autocorrect?
http://www.damnyouautocorrect.com
Re: Home away from Home, on wheels.
Posted: Sun Sep 09, 2012 7:12 pm
by ObnoxiousBlue
DOH! Damn autocorrect.
Well, I spent most my day playing with the bus. I had the day off and it was beautiful out, so it made sense. Of course, I washed it. Also, used some polishing compound to get rid of a few stains on the paint followed by a glazing and a wax. The whole bus was just hard waxed the night before our show so the rest of the body I just hit with a spray wax. Took out some stuff I don't use any longer, like the UHF radio, and my old gps. Cleaned up the wiring going to y third brake light which is now hooked up. I used a cleaner kit to get rid of the haze on my tail lights. They're only about a year and a half old, but I had a white film on them. I used a green scotch bright sponge to get rid of the film, then used the kit to clean and re-seal the lense.
Went to get gas afterwards, started off as a nice ride. I stopped at home depot to grab some felt pads and a vinyl refrigerator safety strap. Came back out and as I depressed the clutch the pedal fell flaccid to the floor. I was a bit beside myself, but after a call to GR I had a new found confidence and crawled under the bus to make the needed repair. I found that the pin that holds the cable to the pedal actually broke. I was going to just replace that, but on closer inspection the "fork" on the pedal end of the cable was also bent. So I decided to press on and do the whole cable. I went to th back, and removed the wing nut off the threaded end of the cable. I pulled it out from the front, and was surprised that the rest of the cable was in really nice shape. I started to feed the new cable through the access hole in the frame of the bus. The worst part of the whole job was getting the cable fed through a tiny little hole that comes out the frame and goes to the tube that runs the rest of the way down the body. The cable went through the tube and out the back end fine. I removed the tube from the side of the tranny which made it easier because the cable didn't have to navigate any angles. It was at this point, I realized I needed some grease, so I ran into the Home Depot and grabbed some heavy duty bearing grease. Back out tote bus, where I applied grease to the underside of the clutch pedal and the union of the cable/pedal. I buttoned that end up and moved to the back. Fed the able through the flexy tube, and mounted that back onto the trans, then fed the threaded end of the cable through the lever on the tranny. I put the wing nut back on, and tightened everything up. The pedal is sitting at a good point, but I do head a bit of a squeak when I push the pedal. So I probably need to pull the pedal back off and hit it with some more grease.
A little over an hour later I was driving home.
Re: Home away from Home, on wheels.
Posted: Sun Sep 09, 2012 7:17 pm
by Glenn
You just saved $100.
Knew yo could do it.
ObnoxiousBlue wrote:I started to feed the new cable through the access hole
Sounds like you gave the bus a colonoscopy.
Re: Home away from Home, on wheels.
Posted: Sun Sep 09, 2012 8:50 pm
by AoT
Thats what makes owning a 35 year old vehicle worth it. I found that once you tackle one of these repairs the next one is easier. Kudos.
Re: Home away from Home, on wheels.
Posted: Mon Sep 10, 2012 8:15 pm
by ObnoxiousBlue
Crawled back under the bus today to adjust the cable, and to lubricate everything to get rid of the faint squeezing I heard. All is better. Also took a few minutes with the grease gun to hit the front end, and spread some on the slider door tracks with my finger.

Re: Home away from Home, on wheels.
Posted: Mon Sep 10, 2012 8:18 pm
by Raj
Nice job mike. Every bit of work you do yourself affords you more and more confidence in your ability. Nice save!
Re: Home away from Home, on wheels.
Posted: Mon Sep 17, 2012 4:58 pm
by ObnoxiousBlue
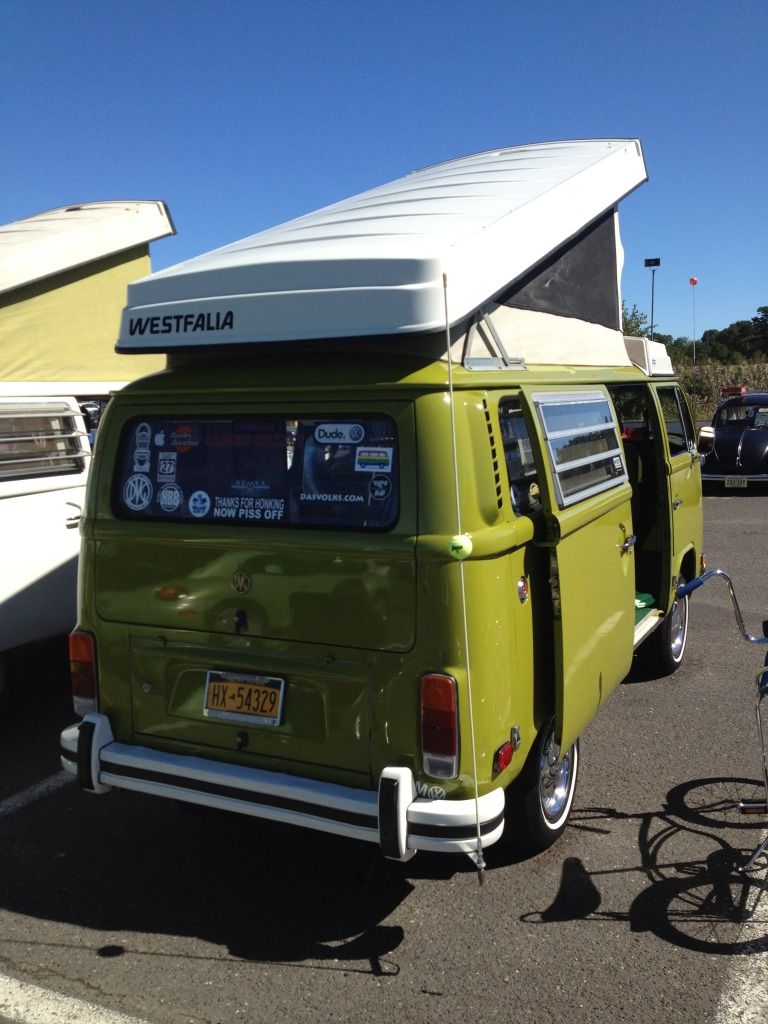
The swap at Flanders this year was famtastic. Found everything I needed, and a couple things I really wanted. Replaced some small stock items Ive used up, like the clutch cable and clevis pin, as well as some broken Westy cabinet handles. Also, picked up a set (L&R) of late bay front marker/turn signals for $15 the lenses are what I really wanted. They're in great shape, and not faded, cracked or scratched. I cleaned them, and swapped those out on the show field. I noticed that the reflectors inside the housings I bought were nicer than mine also, so I'll be swapping them out soon.
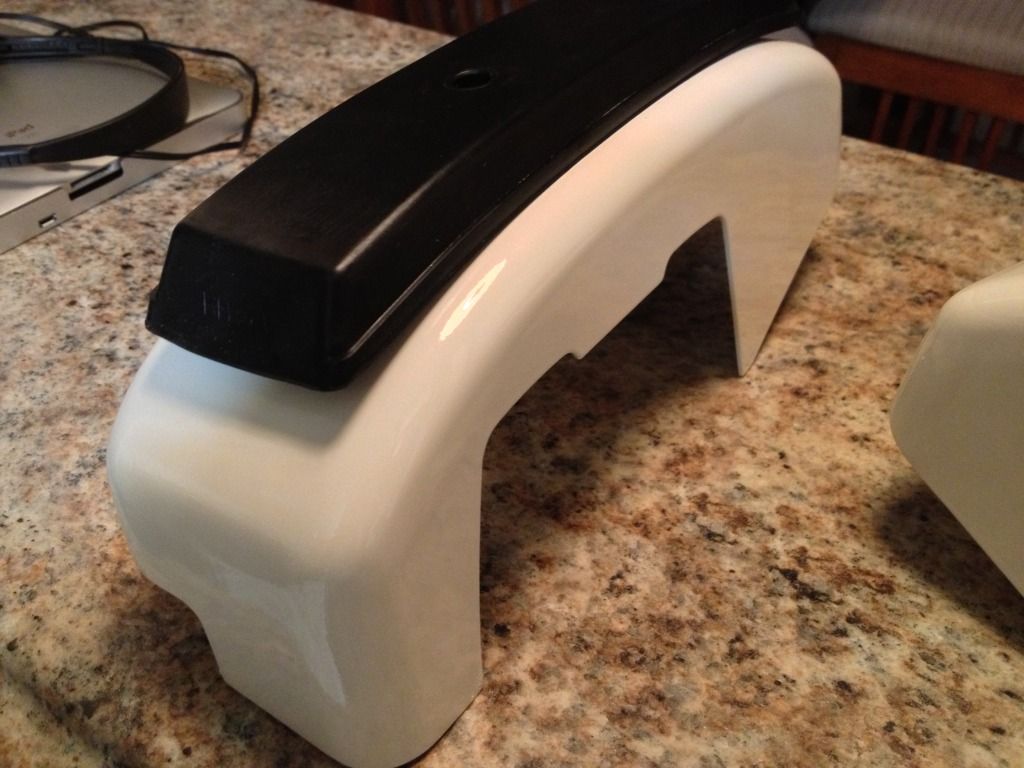
Also, had been wanting to get a set of VWoA bumper overriders for a while. I coordinated with a guy from TS who was bringing a few sets to sell. He had one NOS set for $375 but I wasn't feeling those. 1) I planned on using them, so getting NOS seemed unnecessary because my bumpers are NOS nice anyway. He had a few split up sets, and I decided because I like my roo's that rear overriders would be enough to get the look I wanted. He had nice left's but his right's were all in mixed condition. He let me mix and match to make the best set. So I swapped out the metal brackets and rubber pads to build a nice set. The paint on both was ok, must still not as nice as even my worn bumpers. I had Heard that Rustoleum Satin Heirloom White was a close match to VW's L90D Pastel White, which is the correct color for my bumpers. I sanded the overriders a bit, hindsight probably could've done a bittttt more. I primed, and sprayed the overriders, and just hit them with the first coat of clear. The color looks pretty darn close. I might have to re-re-re-paint my roo's now before Transporterfest!
Will post pics when I get them mounted.
Re: Home away from Home, on wheels.
Posted: Tue Sep 18, 2012 7:36 am
by ObnoxiousBlue
Well, TS has failed me. It is said that Rustoleum's Heirloom White was a "close match" for the factory Pastel White; and close it is. Though, I'm not completely impressed with the color. Some other people say Rustoleum's Canvas White is a better rattlecan match, so I'm going to see if I can find it locally, and give it a shot. If I can't, then I guess I'll have to live with the Heirloom White.
Re: Home away from Home, on wheels.
Posted: Tue Sep 18, 2012 8:12 am
by Tom
Mike ,I was checking out the overriders the guy had and they looked decent, if you don't mind me asking what was he getting for them ? (non-nos)
Re: Home away from Home, on wheels.
Posted: Tue Sep 18, 2012 10:23 am
by ObnoxiousBlue
I paid $100 for my set. He had them listed on TS at $125, but I bought a few other little things off him too, so he came down (SIGNIFICANTLY) I think. Especially since he let me mix and match to take the better of the brackets and rubber pads. He has others in his stash, if you want I can get you his TS username and maybe you can strike a deal too. His complete NOS set was REALLY nice too, but he had someone overseas interested in the set so act soon! LOL
Re: Home away from Home, on wheels.
Posted: Thu Sep 20, 2012 6:18 pm
by ObnoxiousBlue
Annoyed that the primer keeps "crackling" I had to strip them back down to bare, and then reprimed them this afternoon after a good cleaning and wipe with denatured alcohol as I've been told is good for removing dust from sanding. I let them dry first of course as well. The new coat of primer also cracked, idk what the deal is. I'll have to buy more stripper and primer tomorrow. Then, will try this with a new can. Maybe this can was no good. Really wanted these on for Sunday.
Re: Home away from Home, on wheels.
Posted: Sat Sep 22, 2012 8:15 pm
by AoT
How's those over riders looking?
Re: Home away from Home, on wheels.
Posted: Sat Sep 22, 2012 8:28 pm
by ObnoxiousBlue
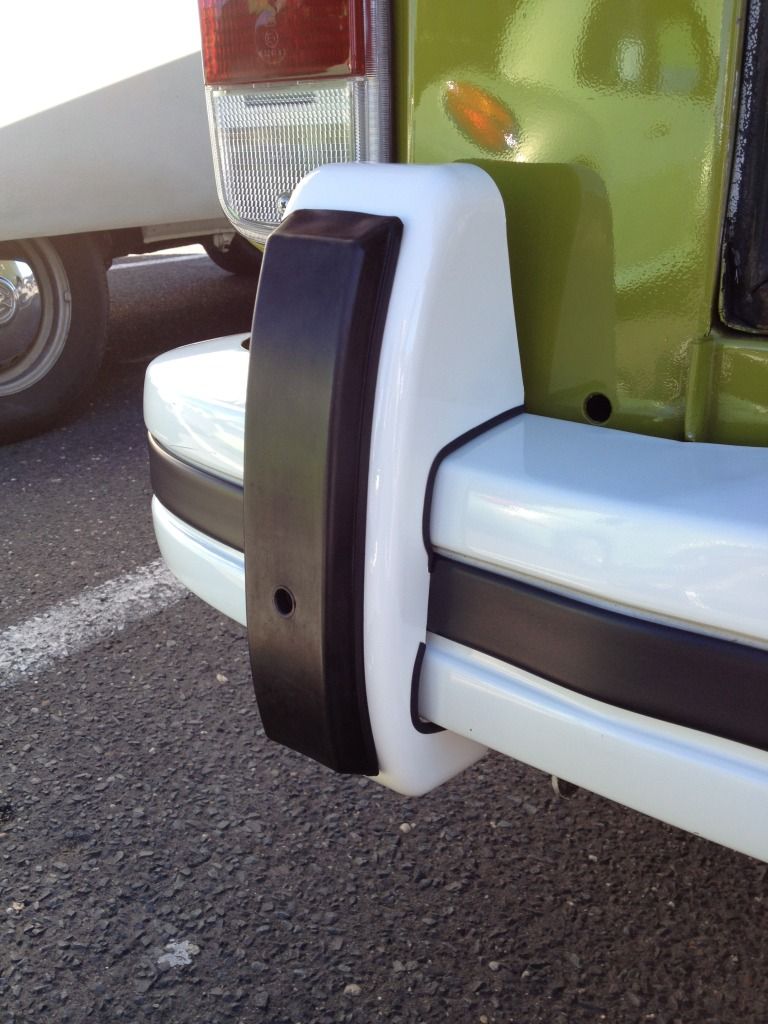
Had a couple set backs. The finish crackled on me and I had to use a chemical stripper to get the overriders back down to metal. After, I used a sanding sponge to scuff up the metal, and used a high build etching primer as my base. Believe it or not, I've had really good luck with Rustoleum's Automobile series. I layered on several light coats, leaving about 10 minutes in between coats. Once content with my primer coat, I let them dry for a few hours.then I started on with my color, again layering on several fine layers of top coat.
In the meanwhile, the rubber pads had been in a aluminum tray, soaking in rubber conditioner. They plumped up and look like they're brand new.
The paint hardened all day today (though, I have found Rustoleum products do harden very slowly despite the label that says can be handled in 4 hours lol)
I wiped the pads dry tonight, and slipped them into place. Then, came these pictures.
Have been contemplating a respray on the bumpers, and Roos with this new "Canvas White" which is eerily close match to the VW stock, "Pastel White" so these may go on the bus tomorrow if I can get the bumpers to shine up after a compounding and wax job.
Re: Home away from Home, on wheels.
Posted: Sun Sep 23, 2012 6:54 pm
by ObnoxiousBlue
Re: Home away from Home, on wheels.
Posted: Sun Sep 23, 2012 9:29 pm
by AoT
Looks real sharp and polished. Good choice on picking those up. You're a savy negoiator!
Re: Home away from Home, on wheels.
Posted: Mon Sep 24, 2012 11:49 am
by Brown
Looks great! I love the detail with the split rubber hose!